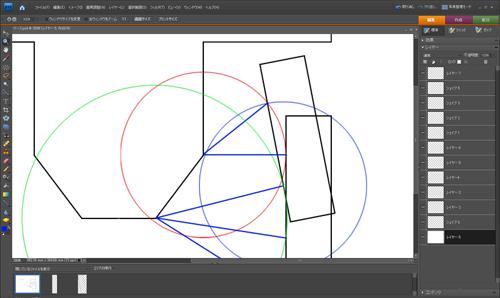
When it comes to suspension arms, you often hear people say that longer arms are better.
But is that really true?
Intuitively, it seems like longer arms should result in less change in the camber angle, so it’s easy to see why people think they’re better.
Today, let’s take a look at the specific effects that suspension arm length has on camber relative to the road, using some illustrations to see what actually happens.
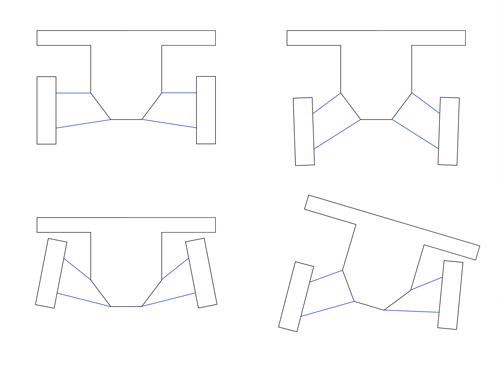
First, here’s the baseline setup.
I’ve drawn something close to the front suspension dimensions of my Roadster.
From top left to top right, then bottom left to bottom right, the four conditions are at ride height, rebound, bump, and body roll.
Throughout this article, camber refers to the tire’s camber relative to the road surface.
So, what happens if we make these arms longer? Let’s find out.
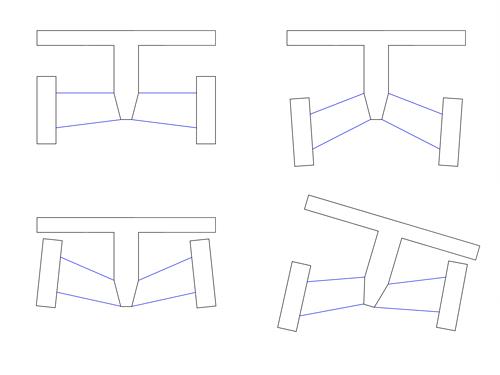
They’re longer now.
Camber during bump is clearly improved.
But camber during rebound has gotten worse.
And while the result during body roll is a bit of a mixed bag, the outside tire also seems to have gotten worse.
So, I guess making the arms longer doesn’t solve everything.
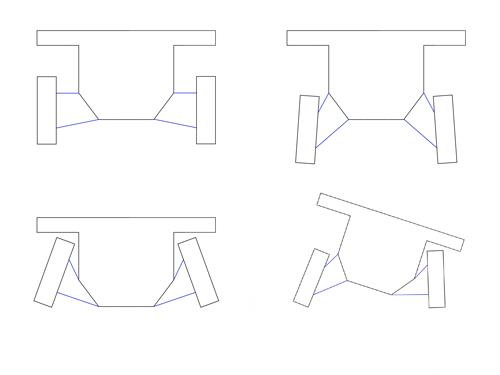
Now let’s go in the opposite direction and make them much shorter.
Camber during rebound has actually gone negative…
Camber during bump is kind of a mess, too.
The inside tire also tilts quite a bit during body roll, but surprisingly, the outside tire actually looks pretty good.
By the way, should the upper and lower arms be parallel?
Or is it better to have them at an angle?
Let’s try it and see.
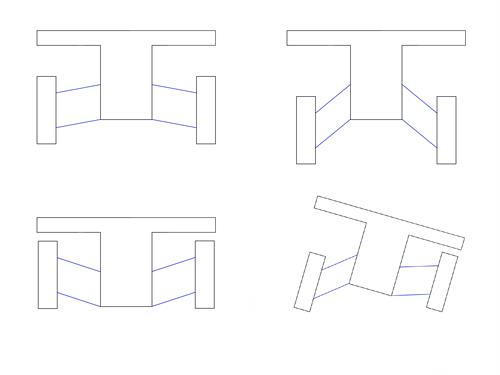
Now I’ve made them parallel.
Camber during both bump and rebound looks very good.
But during body roll, both the inside and outside tires end up tilting quite a bit.
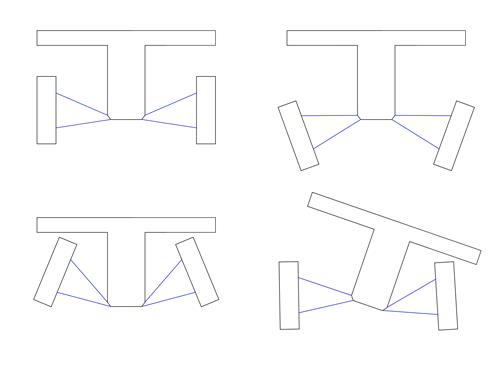
Now let’s give the arms some angle.
Camber during body roll looks good, but camber during bump and rebound is kind of a mess.
Finally, let’s keep the upper arm the same as the baseline setup and make only the lower arm longer.
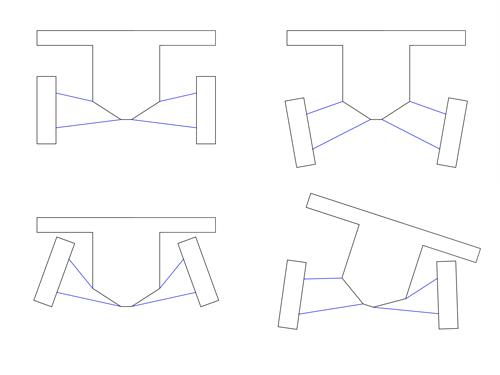
Camber during bump and rebound is still kind of a mess, but it’s better than before.
Body roll also looks pretty decent.
But if it were my own car, I think I’d still stick with the baseline setup.
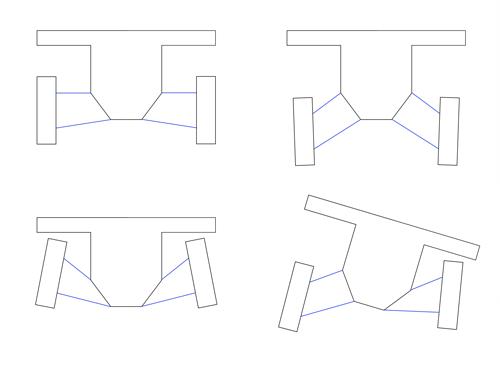
So, as you can see, camber change is influenced by a variety of factors, including the ratio between the lengths of the upper and lower arms, as well as the angles of those arms.
With a MacPherson strut suspension, there is no upper arm. Instead, the hub carrier is connected to the lower arm and the upper mount through the strut. That makes camber control during body roll a bit more challenging, but the basic tendencies are still fairly similar.
Longer arms aren’t necessarily better, and the same is true for multi-link suspensions.
A multi-link suspension offers a high degree of design freedom because dividing the suspension into multiple links makes it possible to position the instantaneous axis outside the hub carrier.
But depending on how you look at it, you could also say that it’s simply a double wishbone suspension with greater design freedom. So even with a multi-link suspension, the general tendencies shown above remain the same.
Whether it’s camber change or toe change, if you don’t want the suspension moving around, just use stiffer springs.
On the other hand, torsion beam, rigid axle, and full trailing arm suspensions exhibit very little camber change throughout suspension travel.
The trade-off is reduced tire contact and larger changes in wheelbase, but there is no such thing as a perfect suspension. In the end, it all comes down to what you’re trying to achieve.
For sports cars, it also depends on the type of course you’re driving.
On high-speed corners, you’d generally want stiffer springs to keep the camber as close to vertical relative to the road as possible during body roll.
On low-speed corners, however, springs that are too stiff also reduce changes in the roll axis inclination, making it easier to get understeer on corner entry and oversteer on corner exit.
Ideally, you’d tune that with the anti-roll bars. But take the S2000, for example. It’s often said that, because of its bump-steer characteristics, it’s better to use stiffer springs and simply keep the suspension from moving very much in the first place. In practice, many of them do seem to exhibit this kind of understeer-then-oversteer behavior.
Once you get into that territory, the next topic is mechanical LSD setup… but let’s save that for another day. The mechanisms at work in a car really are fascinatingly complex.
One thing I really recommend is drawing these kinds of diagrams yourself, experimenting with different arm lengths and angles.
When you actually draw them, you suddenly find yourself thinking, “Oh, so that’s what happens.” It’s a much more effective way to understand the concepts.
If you’re not familiar with Photoshop or Illustrator, those programs can seem intimidating. But as long as you understand the geometry, a pencil, a compass, and a ruler work just fine.
Give it a try. It’s a great way to learn.