There are countless factors involved in suspension tuning, and I certainly don’t know everything about all of them.
Damping force, suspension bushings, differences between spring manufacturers, preload, bump stops, anti-roll bars, alignment changes through suspension travel, compliance steer, roll centers… and of course, vehicle weight distribution also plays a role.
Once you start including tire characteristics and differential behavior, the whole topic becomes incredibly complicated.
Whenever suspension comes up, I always start with one thing: managing suspension travel.
It’s one of the most fundamental concepts, and if you get this wrong, it doesn’t matter how perfect everything else is—your suspension setup will still suffer.
Think of it like learning tennis.
Sure, practicing your serve and your smash is important, but if you don’t even have the basic fitness to play, none of that matters.
The fundamentals always come first.
So let’s narrow the discussion down to springs.
Everyone knows that if a spring is extremely stiff, the ride becomes extremely harsh.
But if it’s too soft, the suspension bottoms out, which also makes the ride uncomfortable.
Performance suffers as well.
So how stiff should the spring actually be?
The truth is, you can’t answer that without looking at the actual car.
If you don’t know the current condition of your suspension, all you can do is guess.
“Maybe it’s like this…”
“It’s probably around this much…”
If you’re making changes based on vague assumptions like that, you’ll never really figure out what’s causing the problem.
“Doctor, I want to lose weight.”
“All right, let’s start a diet.”
“I’ve actually been on this diet for about six months.”
“Oh? Has it been working?”
“I’m not really sure.”
“How many kilograms have you lost?”
“I don’t know.”
“…May I ask what you weigh right now?”
“I have no idea. I haven’t measured.”
That doesn’t get us anywhere.
First, you measure.
Then you try your own solution.
Then you measure again and see what changed.
That’s why the first step is to understand the current state of your car’s suspension.
Oddly enough, many coilover manufacturers don’t even publish the piston rod stroke, and some don’t even list the overall damper length.
Because of that, people often judge a suspension simply by looking at the spring rate.
But if you focus on the things that actually matter, you can properly manage your car’s suspension travel.
Now, suspension itself is a complicated subject, but managing suspension travel isn’t actually that difficult.
That said, if you don’t understand how a damper is built, it can be hard to picture what’s really happening.
So this time, I’d like to explain the basics first.
This is a damper I used years ago.
It’s a rear damper for a Mazda Roadster (MX-5).
Its construction is nice and simple, so it’s perfect for this explanation.
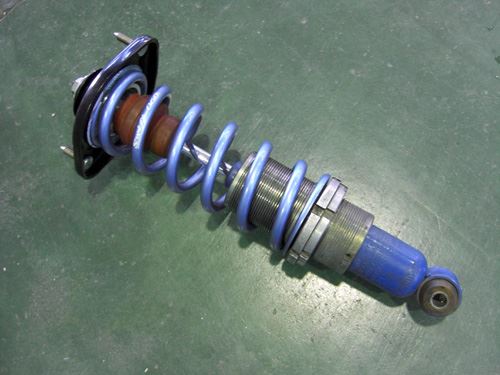
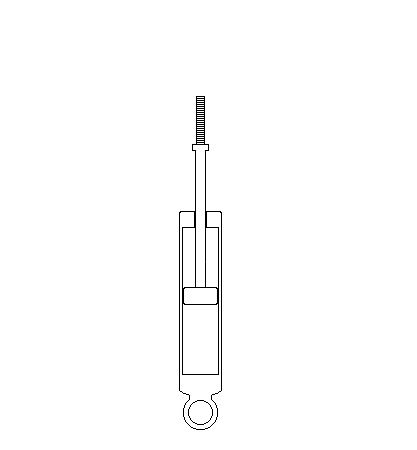
The next illustration is a simplified drawing based on that damper.
I’ve left out things like the bump stop and the upper mount bushing, but if you notice anything missing, just fill in the blanks in your head.
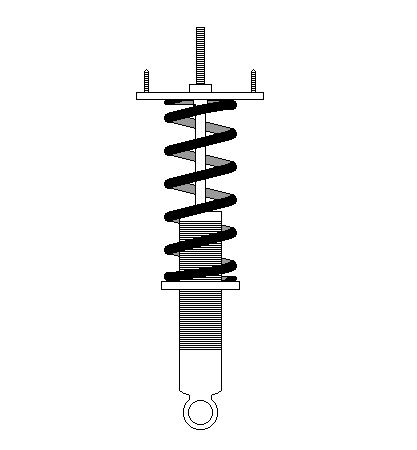
Now let’s remove the spring and the upper mount as well.
That leaves us with just the damper itself.
I’ve also labeled the main parts for reference.
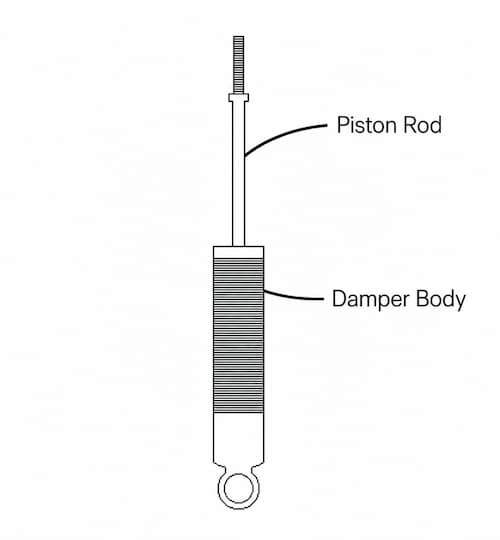
Here’s an animation showing the piston rod moving up and down.
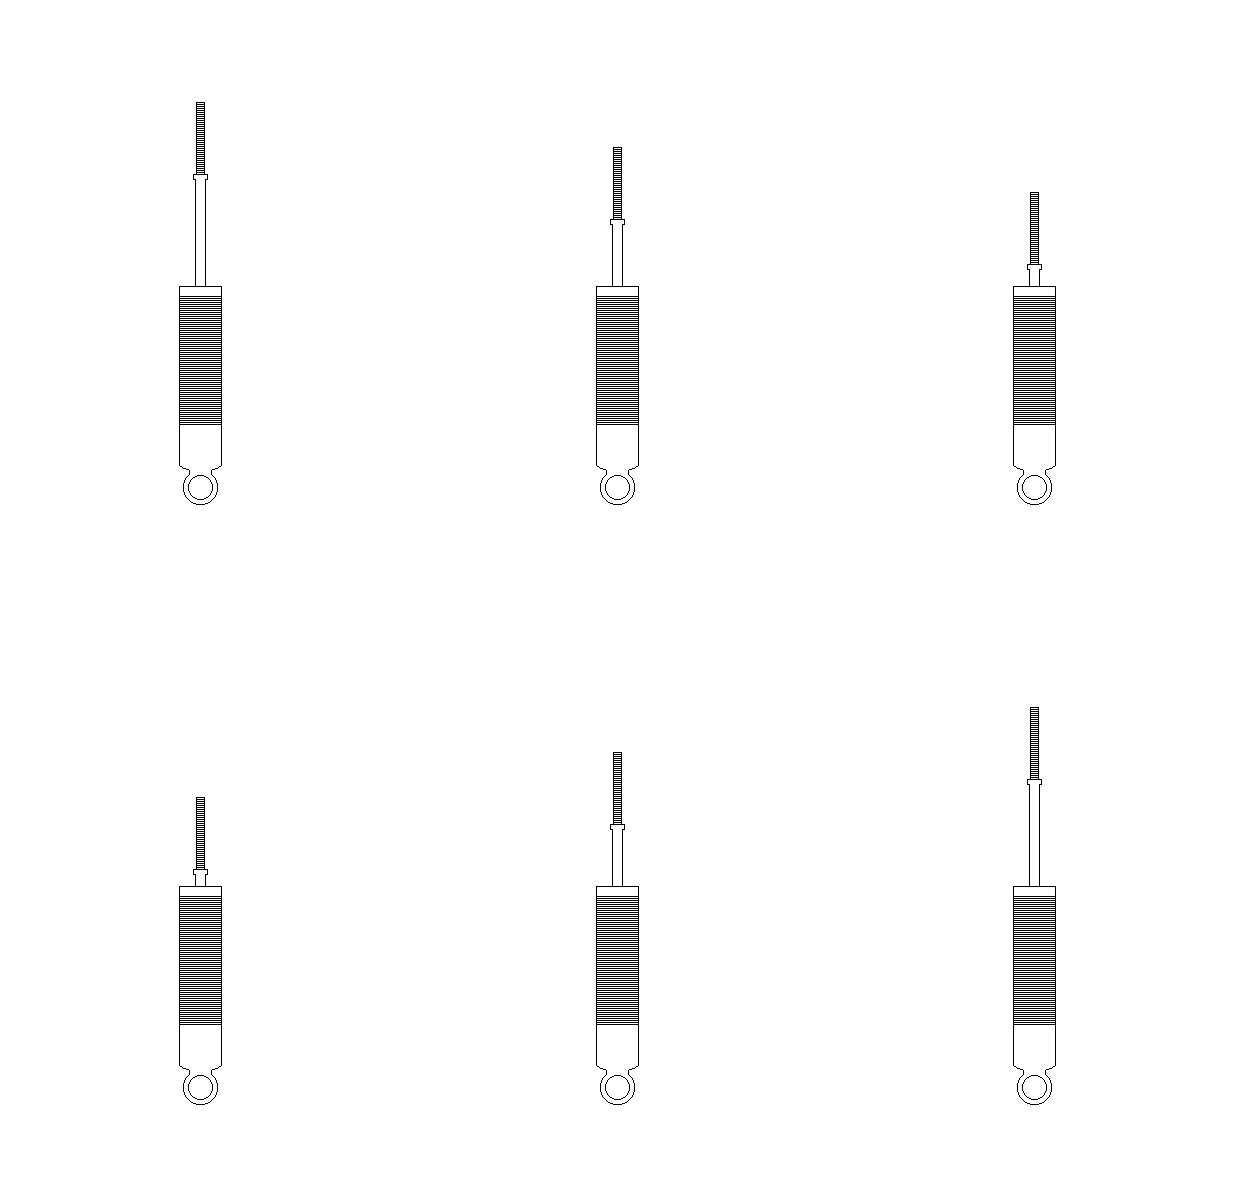
To make it even easier to understand, here’s a cutaway view of the damper.
Yes, I know it’s supposed to be a twin-tube damper, and this isn’t actually drawn like one.
Let’s just overlook that for now.
Simple illustrations are the easiest to understand.
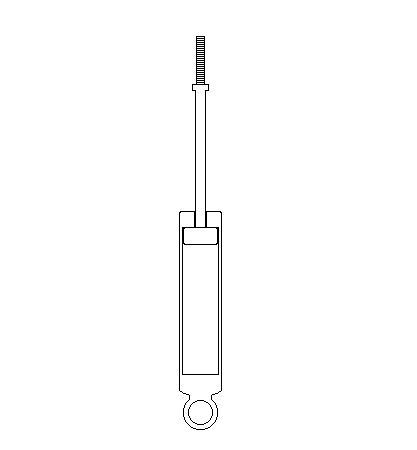
When it’s compressed about halfway, it looks like this.
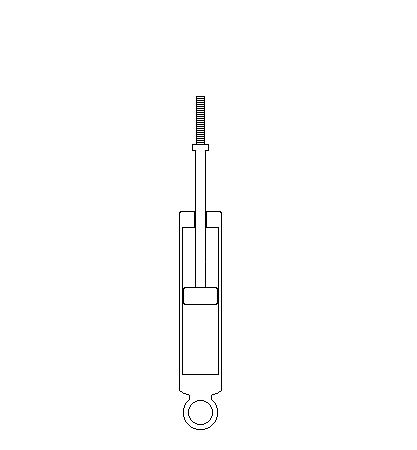
And when it’s fully compressed, it looks like this.
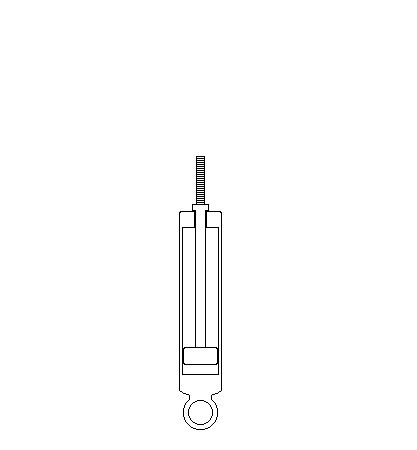
Pretty straightforward, right?
Is everyone still with me?
So far, nothing too difficult.
Managing suspension travel isn’t complicated, so stick with me.
Now, when a car drives over a bumpy road, the suspension moves up and down.
That’s exactly what it’s designed to do.
But imagine if the suspension had almost no travel.
It wouldn’t be able to absorb bumps very well, so the ride would become harsh.
In extreme cases, the car would bounce all over the place, and cornering performance would suffer too.
That’s why suspension travel is so important.
The available suspension travel is ultimately limited by how far the damper itself can move.
So if you want your suspension to work as well as possible, you need to manage the damper’s travel.
That’s what this article is about.
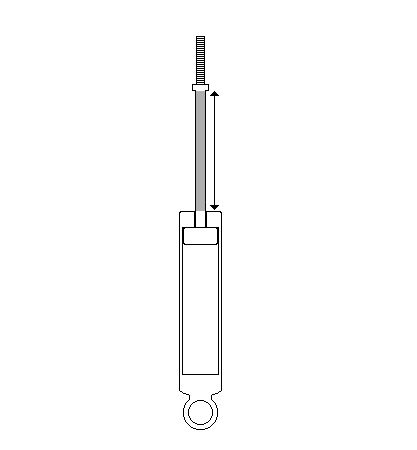
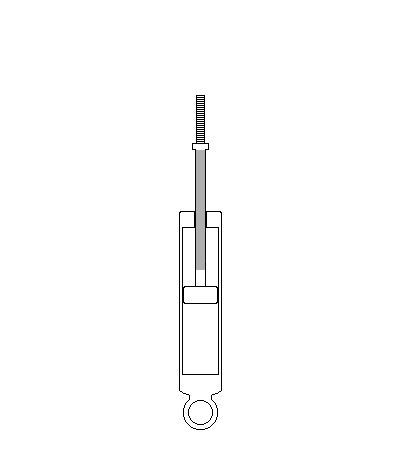
By the way, I’ve colored the section of the piston rod that moves in and out of the damper body in gray.
The length of this section is what we call the rod stroke.
If the rod stroke is long, the damper body also has to be longer, making the entire damper longer. As a result, it becomes harder to lower the ride height.
On the other hand, if the rod stroke is too short, the suspension is more likely to bottom out, which hurts ride quality.
From the standpoint of suspension travel alone, I’d rather have plenty of rod stroke, even if it means the car can’t be lowered as much.
Some coilovers are advertised as having “plenty of suspension travel,” but very few manufacturers actually publish the rod stroke.
Sometimes you don’t realize how little stroke there is until after you’ve bought them and measured it yourself. That can be a pretty shocking discovery.
Now let’s keep going.
Once the damper is installed on the car and you lower it off the jack, the spring compresses under the vehicle’s weight, and the damper compresses with it.
That makes sense, right?
The amount it compresses depends on the vehicle weight and the spring rate, but for simplicity, let’s assume it compresses by exactly half of the rod stroke.
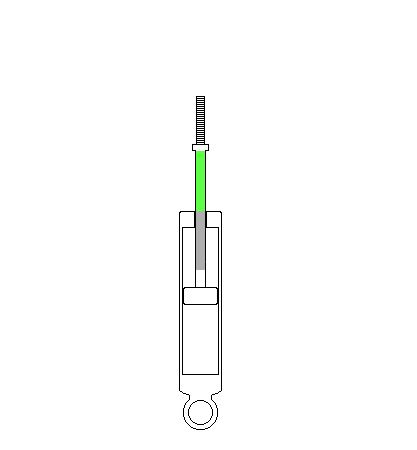
Now let’s color everything above that halfway point green.
The green section is the remaining compression travel.
From here on, I’ll call it compression travel.
For example, if this section is 100 mm long, the damper can still compress another 100 mm.
But if it’s only about 20 mm long, then the damper only has another 20 mm before it bottoms out.
It’ll bottom out almost immediately.
Bang! Bang!
The remaining gray section is how much farther the damper can extend.
This is called rebound travel.
From here on, I’ll call it rebound travel.
For example, when the body bounces upward after hitting a bump, the damper extends.
If the rebound travel is 100 mm, it can extend another 100 mm from this position.
There’s a lot more to say about rebound travel, but we won’t go into it here.
For now, let’s keep our focus on the compression side.
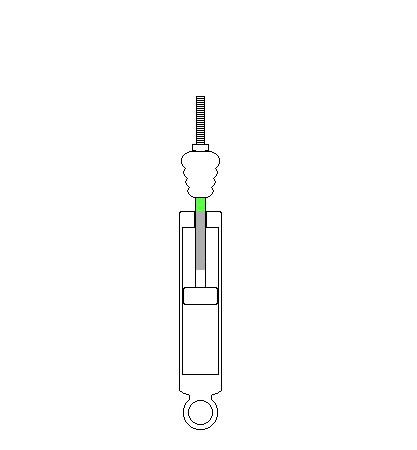
Now, even if the compression travel is 100 mm, you can’t actually use all of it.
Every real damper has a protective part called a bump stop.
So the full 100 mm isn’t truly available.
Let’s represent the bump stop with yellow.
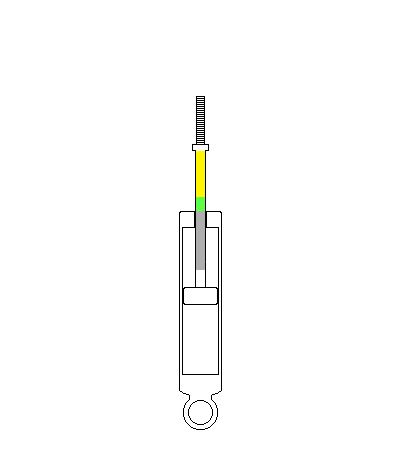
As the bump stop compresses, it gets progressively stiffer.
Can you picture that?
It’s made from rubber or urethane, so the more you squeeze it, the harder it becomes.
And once it gets very stiff…
Bang! Bang!
The suspension starts hitting hard.
Let’s color that area red.
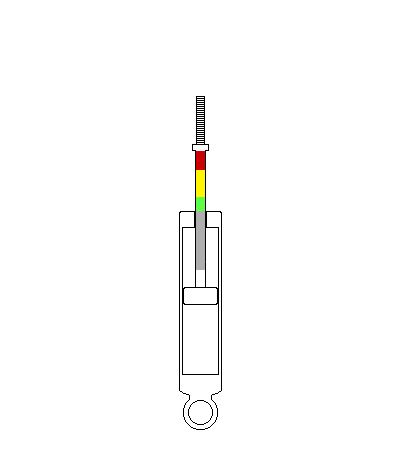
So, think of it like this:
Green is safe.
Yellow means be careful.
Red means danger.
If you’re experienced with suspension tuning, making good use of that yellow area can be an important part of the setup.
But if you’re still learning, you don’t need to worry about that yet.
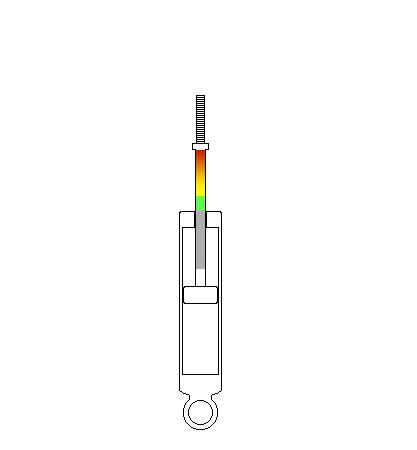
In reality, a bump stop doesn’t suddenly become stiff all at once.
It would probably be more accurate to draw it as a color gradient.
It gets progressively stiffer as it’s compressed.
You can picture it that way.
Now then…
Let’s say we replace the springs with lowering springs.
The car sits lower because it compresses farther under its own weight.
That means the balance changes completely.
Rebound travel increases, while compression travel decreases.
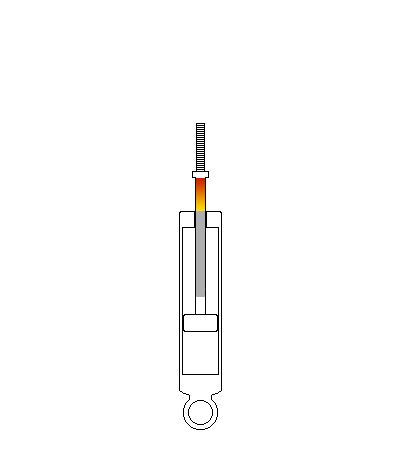
See how the gray section has become longer?
That’s the increased rebound travel.
Meanwhile, the green and yellow sections have become shorter.
That’s the reduced compression travel.
Now let’s look at the opposite case.
Suppose we install springs that are stiffer than the factory ones.
The suspension doesn’t compress as much under the vehicle’s weight, so the ride height goes up.
That means compression travel increases, while rebound travel decreases.
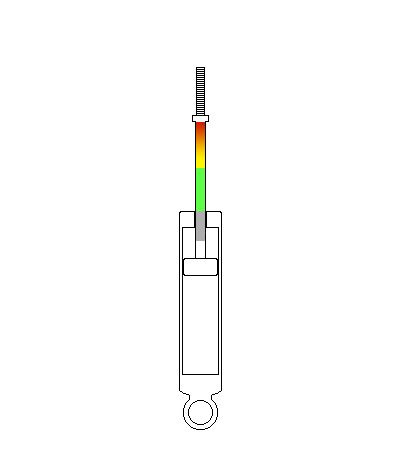
The green section has become longer.
That’s the increased compression travel.
Meanwhile, the gray section has become shorter.
That’s the reduced rebound travel.
Even if the spring rate stays the same, adding preload also increases compression travel while reducing rebound travel.
I’ll leave preload for another article.
So, if the green section is very short, there’s very little compression travel available.
Even small bumps can make the suspension bottom out, giving you an awful ride.
The longer the green section is, the more compression travel you have, so there’s much more room before the suspension bottoms out when it hits a large bump.
Of course, increasing compression travel also means reducing rebound travel.
If the gray section becomes too short, you’ll eventually run into top-out, which also makes the ride uncomfortable.
As always, it’s all about finding the right balance.
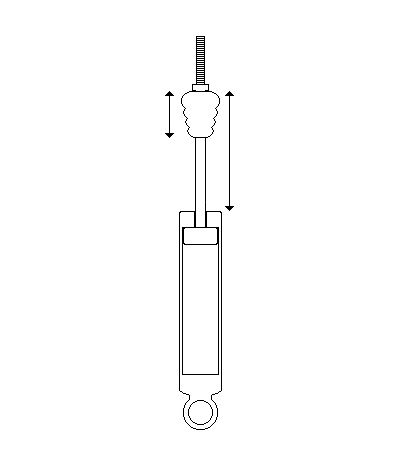
So, by measuring the rod stroke and the length of the bump stop, you can first understand the damper’s basic potential.
Then, by choosing the spring rate—or adjusting the preload—you decide how to divide that available travel between compression and rebound.
The total travel is fixed.
All you can do is decide how to distribute it.
Using an extremely stiff spring gives you more compression travel and makes bottoming out less likely.
But if the spring itself is already very stiff, the ride will still be harsh even if the suspension never bottoms out.
On the other hand, if the spring is too soft, there isn’t enough compression travel, so it bottoms out easily.
The result is the same:
Bang! Bang!
So how do you know what’s just right?
You measure the dimensions.
You calculate the loads.
Then you choose a spring rate that just barely satisfies the requirements.
That’s why measurement comes first.
Hopefully that gives you a better idea of why measuring is so important.
So…
How much compression travel does your own car actually have?
How much rebound travel?
How much room is left before the bump stop?
Does it bottom out easily?
Or does it have plenty of margin?
If you’re starting to wonder about those things, then this article has done its job.
Actually…
I hope it does.
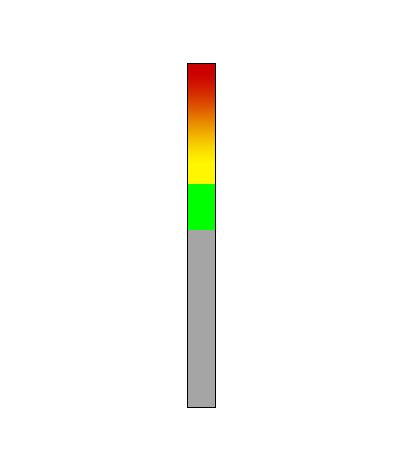
Now, let’s do a quick review.
Once you understand what it means to manage suspension travel, we don’t really need the full damper illustration anymore.
From here on, we’ll only look at the rod stroke itself.
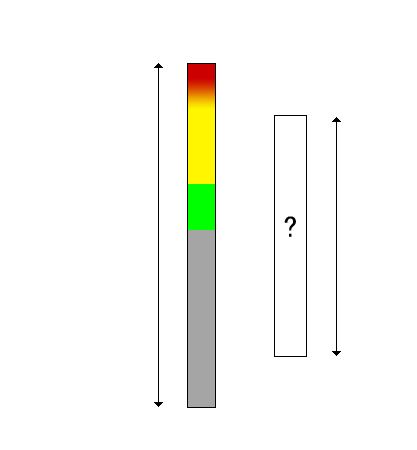
I’d like you to reach the point where you can understand everything just by looking at this.
If you can picture what’s happening from this simple diagram, you’ll have a good grasp of suspension travel management.
The gray section is the amount the suspension has compressed under the vehicle’s weight—that is, the rebound travel.
The green section is the part of the compression travel that doesn’t touch the bump stop.
The yellow section is the part of the compression travel where the bump stop has started to engage, but hasn’t become very stiff yet.
The red section is where the bump stop has been compressed so much that it has become extremely stiff.
That’s the area where the suspension starts going Bang! Bang!
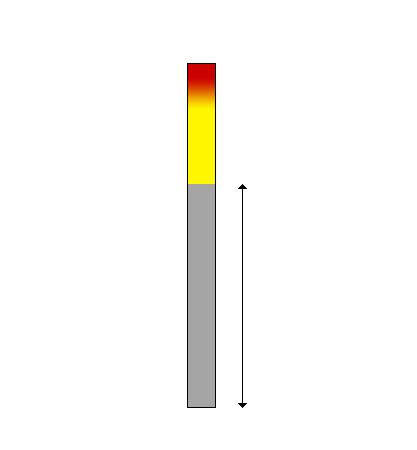
Now, suppose you replace the springs with lowering springs.
The suspension compresses more under the vehicle’s weight, so the ride height drops.
But that also means the length indicated by the arrow—the gray section—increases.
As a result, the available compression travel decreases.
So the suspension becomes more likely to bottom out.
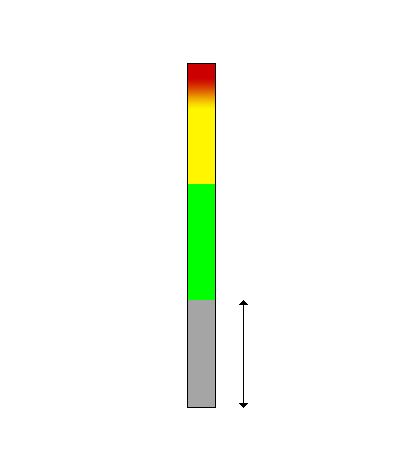
Now suppose you install stiffer springs.
The suspension compresses less under the vehicle’s weight, so the ride height rises.
That means the length indicated by the arrow—the gray section—becomes shorter.
As a result, the available rebound travel decreases.
So the suspension becomes more likely to top out.
And if the rod stroke itself is short to begin with, the total available suspension travel becomes smaller.
That means both compression travel and rebound travel tend to be limited.
You can still try to balance the two within that limited range, but there’s only so much you can do if the rod stroke is simply too short.
Ideally, you want to have enough rod stroke for the job.
So that’s basically how suspension travel is managed.
As you look at the diagrams, try to imagine how the suspension is actually moving.
Bonus
If you know the total rod stroke and the load applied to the spring, you can calculate the balance between rebound and compression travel.
If you can use a calculator, you can do it.
You can estimate the spring load from the axle weights listed on the vehicle inspection certificate, or you can measure it directly using a zip tie on the piston rod.
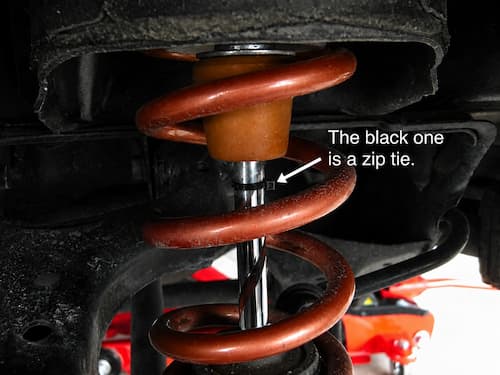
First, jack the car up until the suspension is fully extended.
Wrap a zip tie around the piston rod, then slide it all the way down until it touches the damper body.
Next, lower the car onto the ground so it’s sitting under its normal weight.
Then jack it up again.
You’ll see that the zip tie has moved from its original position.
Measure how far it moved with a ruler.
That distance is the rebound travel—in other words, the amount the damper compressed under the vehicle’s weight, which is the gray section shown throughout this article.
For example, suppose that distance is 60 mm, and the spring rate is 50 N/mm.
A 50 N/mm spring requires 50 N of force to compress it by 1 mm.
If it compressed by 60 mm, then the load on the spring was:
50 × 60 = 3,000 N
That’s the basic idea.
Once you know that a certain distance corresponds to a certain load, you can start calculating the rest.
By the way, not all bump stops are the same.
Even if two suspensions bottom out, a long, compliant bump stop absorbs the impact much more gently than a short, rock-hard one.
Of course, a longer bump stop also needs more space.
It’s physically longer, after all.
That means you need additional compression travel to use it properly.
These are the kinds of things you consider when choosing a spring.
In other words, spring selection should basically be guided by calculation.
(Of course, experienced tuners consider many other factors as well, but if you’re just getting started, understanding what’s explained here is more than enough.)
That’s more or less what “managing suspension travel” actually involves.
The calculations themselves aren’t difficult.
If you can do basic arithmetic, you can handle them.
It may feel a little confusing at first, but there’s nothing especially complicated about it.
Try working it out on a calculator a few times yourself.
Once you get used to it, it’s actually pretty easy.
So if you’re interested, give it a try!