In the past, partially threaded coilovers — also called “spring-perch-adjustable” coilovers, since ride height was adjusted by moving the lower spring perch — were the standard choice, and fully threaded coilovers, which adjust ride height independently of the spring, were considered a premium product. These days, however, depending on the vehicle, it can even be difficult to find a partially threaded coilover.
Partially threaded coilovers are sometimes considered less advanced because adjusting ride height by moving the lower spring perch also changes spring preload. However, they also have advantages, such as greater oil capacity and potentially longer available stroke compared to some fully threaded designs.
Also, with enough knowledge, it is possible to modify the upper mount area and change the overall length of a partially threaded coilover without changing spring preload. It requires more work, but it allows you to set the coilover length while keeping the original preload.
Some of these techniques may be becoming less common, so I would like to share what I know.
Even with fully threaded coilovers, these methods can be useful when the adjustment range of the lower mount is not enough, or when there is a reason why the lower mount cannot be used for adjustment.
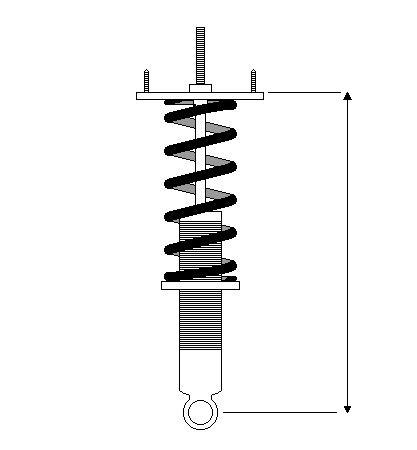
First, let’s review some basic suspension terminology: the “length” of a coilover refers to the overall length of the coilover assembly, normally measured from the top surface of the upper mount (the point where it attaches to the vehicle body) to the center of the mounting hole on the lower arm side.
With a fully threaded coilover, this length can be changed by rotating the lower mount, but a partially threaded coilover does not have this type of lower mount adjustment mechanism.
Therefore, the idea is to adjust the overall length by modifying the upper mount area instead.
There are several ways to do this.
1. Adjusting with washers
Normally, the upper mount of a coilover is secured with a double-nut (jam nut) arrangement, but there is usually some extra threaded section remaining on the damper rod above the upper mount.For example, if there is around 20 mm of unused thread, you can increase the overall length by that amount without adding spring preload.
The process is as follows: first, remove the coilover from the vehicle and disassemble the upper mount. Then, raise the spring perch by 20 mm.
At this point, if you try to reinstall the upper mount normally, you would need to compress the spring by 20 mm, which would add preload — but if you place ten 2 mm washers under the upper mount, raising its position by 20 mm, you can assemble everything without increasing spring preload.
In other words, you have effectively increased the coilover’s overall length by 20 mm.
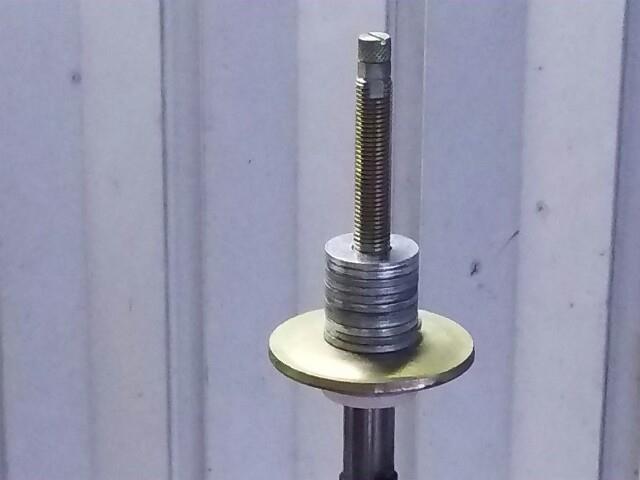
2. Sleeve nuts and set screws
When using the washer method described above, there is one possible problem: if the threaded section of the damper rod is not long enough, you may find that the upper mount can barely be installed, but there is not enough thread left to properly tighten the nut.In this situation, a sleeve nut can be used, which allows you to tighten the nut even in that case.
A sleeve nut is a special type of nut with a threaded sleeve that extends down the rod — like this.
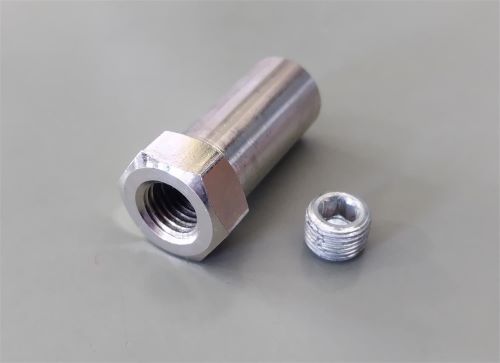
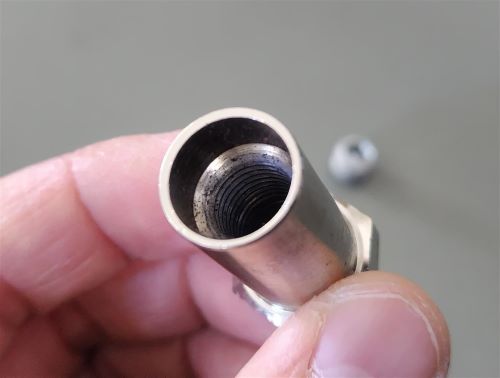
This is a sleeve nut sold as a replacement part for the NieleX “Lowered NA Mount Kit” (Japanese-language product page: https://nielex.net/footwork_lda.html).
Although this particular part is designed for the NA/NB Mazda Roadster (Miata), it is available in several thread sizes — M12 × P1.25, M10 × P1.0, M12 × P1.0, and M10 × P1.5 — so it can also be used on other vehicles if the dimensions match.
Because the sleeve section itself is threaded and reaches down past the short thread section, it can grip further down the rod even at a mounting position where the damper rod thread is too short for a standard nut to tighten.
However, when installed in this way, there may not be enough space to use a double-nut arrangement, so a set screw is used instead as a locking method to prevent loosening.
3. Extended damper rod
If 20 or 30 mm of additional length isn’t enough, and you need much more adjustment range, another option is to extend the threaded section of the damper rod.This is an “M10×1.25 +55 mm stem rod extension” made for the YZ Super Road coilover (Japanese-language product page: https://www.yzz.co.jp/shock.htm).
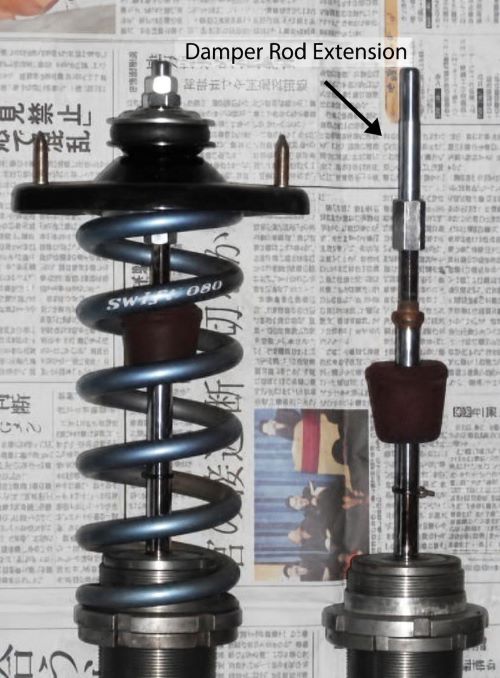
By installing an extension piece onto the existing damper rod threads, you can effectively increase the length of the rod.
In the example shown, only the upper part of the extension is threaded, but if additional threads are machined on the lower section, the entire length can be utilized.
However, because the lower section of the extension uses a long hex nut, the upper mount cannot be fixed at that location.
4. High-mount upper mounts
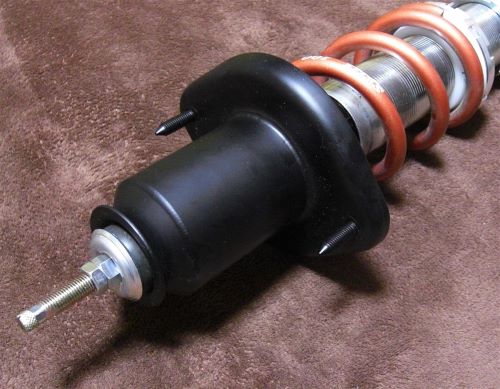
In that case, another solution is to keep the upper mount fixed higher on the damper rod and use a high-mount upper mount, which lowers the vehicle mounting point while allowing the upper mount to be positioned higher on the rod.The ride height is determined by the position where the upper mount attaches to the vehicle body, not simply by where it is fixed on the damper rod — so even if the mounting position on the rod is raised, the vehicle height can remain unchanged if the upper mount lowers the body mounting point.
The amount of adjustment possible depends on the design; some products, such as the NieleX Pro Spec SS/AJ, even allow adjustment of the height (Japanese-language product page: https://nielex.net/footwork_psa.html).
For fixed-type designs, the structure itself is relatively simple, so some people have them custom-made by machine shops or metal fabrication shops.
The high-mount upper mounts I use are also custom-made and have an extremely high mounting position.
5. Upper mount spacers
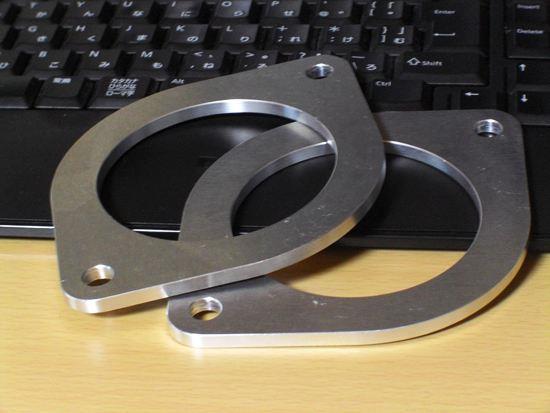
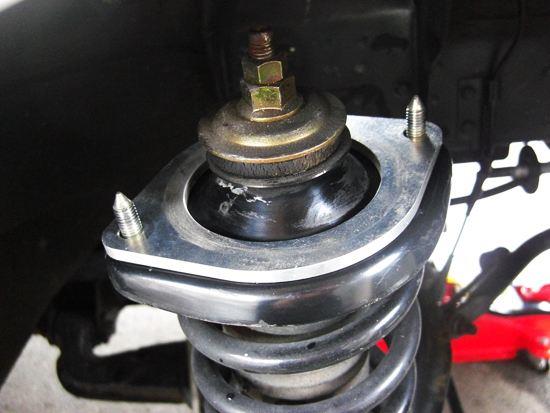
The methods described above (1–4) adjust the coilover length by changing the mounting position of the upper mount, but there is another approach: adding a spacer between the upper mount and the vehicle body.
A spacer of around 5 mm can usually be installed without much difficulty, but some people take this further by replacing the upper mount mounting bolts with longer ones and increasing the length by around 30 mm.
There are many possible solutions when it comes to suspension tuning.
Bonus: Letting the spring go loose
If you have enough available bump stroke, you can also adjust ride height without adding preload by assembling the coilover with a small amount of spring free play.
If you do not want the spring to slip off the guide on the spring perch, you can add a low-rate helper spring to keep it properly seated.
That concludes the methods for changing the overall length of a partially threaded coilover.
Please note that methods 2 and 3 cannot be used with coilovers that have the damping adjustment dial located at the top of the damper rod (they can be used if the adjustment dial is located on the side of the damper body or at the bottom of the damper).
All of these methods require more effort compared to simply adjusting the lower mount on a fully threaded coilover, but the key point is that ride height adjustment and spring preload are separate things — these methods simply provide another way to change the overall coilover length while keeping the spring preload unchanged.
And honestly, experimenting with these kinds of solutions can be surprisingly enjoyable — it really gives you that feeling of, “I’m actually tuning my suspension,” haha.