When you hear the term “secondary spring,” what comes to mind?
There are several types of secondary springs, including helper springs, tender springs, and primary springs. Here, I use “secondary spring” as a general term for a spring that is used in combination with, but separately from, the main spring.
For example, a 20 N/mm helper spring and a 200 N/mm primary spring differ by a factor of ten, so they can serve very different purposes in a setup.
I previously wrote about some basics of secondary springs in relation to common misconceptions about their effect on understeer/oversteer characteristics. This time, I’d like to get into the details of how to set them up.
As a basic rule, you add a secondary spring at the end of the car where you want more grip.
If you want to reduce understeer, add one at the front. If you want to reduce oversteer, add one at the rear. If you want to improve the overall balance, add them at both ends.
The result is better road compliance, a change in the front/rear grip balance—for better or worse—and reduced steering response.
Because these drawbacks can become quite noticeable, choosing the right spring and figuring out how to adjust it are both extremely important.
Spring Rate Across the Suspension Stroke
With secondary springs, a lot depends on the spring you choose: what the resulting spring rate will be, whether the secondary spring will reach coil bind at 1G, how much preload to use, and so on.
Once you start thinking about what happens to rebound travel and the load on each tire, it can seem pretty complicated, right?
But really, this is just an extension of managing suspension travel, so what you’re actually doing isn’t all that difficult.
Basically, the question is: “Over what part of the actual suspension travel do I want to use what spring rate?”
For example, you might have something like this:
Case (1)
Main spring: 100 N/mm
Secondary spring: 10 N/mm
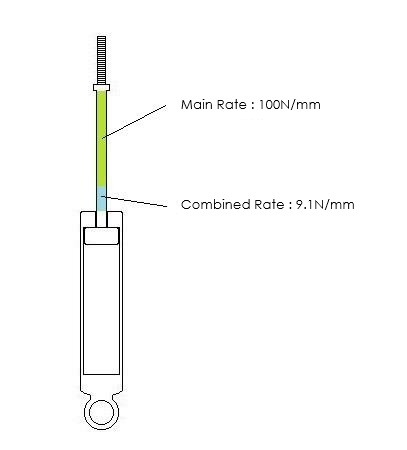
Case (2)
Main spring: 100 N/mm
Secondary spring: 60 N/mm
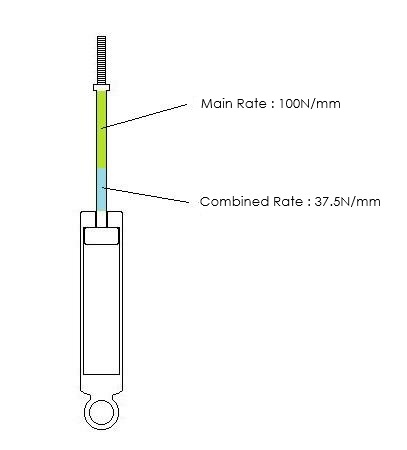
Case (3)
Main spring: 150 N/mm
Secondary spring: 200 N/mm
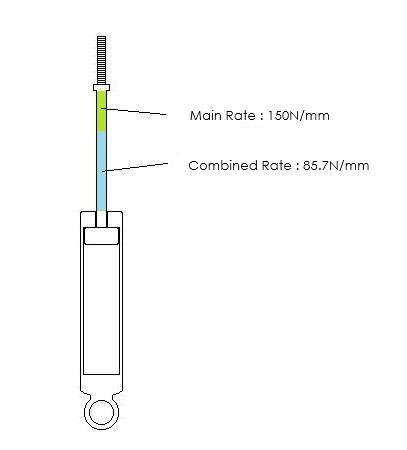
Case (4)
Main spring: 250 N/mm
Primary spring: 150 N/mm
Helper spring: 30 N/mm
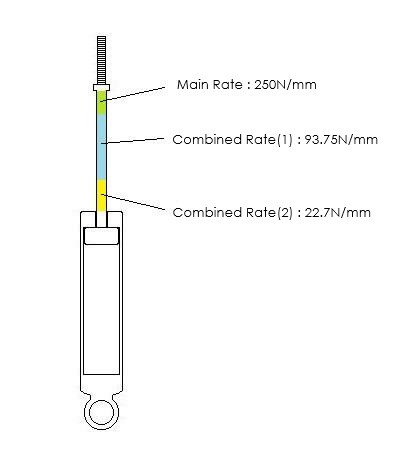
Case (5)
Main spring: 100 N/mm
Bump rubber rate: Variable
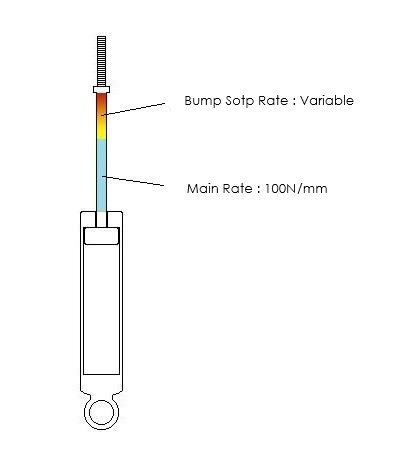
So, it’s not really all that complicated. What matters is having a solid understanding of which part of the suspension travel corresponds to which spring rate.
One thing to keep in mind is that the actual rate of secondary springs can differ considerably from their stated rate. They also tend to settle relatively quickly, so theoretical calculations and actual behavior often don’t line up perfectly.
It’s difficult to determine the spring rate precisely down to the millimeter, but knowing the approximate range of the spring rate helps you develop an intuitive understanding of how secondary springs work.
To do that, you’ll need the following information in addition to the spring specifications:
(1) Damper rod length
(2) 1G load on the damper
(3) Maximum load on the damper
The value in (3) varies depending on the tires and the course, so it should be measured under the actual conditions.
Adding a Secondary Spring Isn’t a Free Lunch
Now, this applies to secondary springs of any type: simply adding one does not automatically make a car handle better.
For example, suppose you have a car with severe oversteer and decide to add a secondary spring of around 50 N/mm to the rear to address it.
Simply adding a secondary spring to the rear can cause all sorts of problems. The ride height may change, the suspension may bottom out earlier, or the car may lose speed while cornering.
The first step is to make sure the ride height stays the same before and after adding the secondary spring. Then, you need to bring the handling back up to the level it was at before the secondary spring was added.
Only after that should you start looking for a setup that actually takes advantage of the secondary spring.
And even then, there are cases where, no matter what you do, the car simply won’t handle better than it did without the secondary spring.
You’ll notice this particularly on courses where quick steering response is important.
Coil-Bind Load Is What Actually Matters
One of the most important factors in secondary-spring setup is coil-bind load.
By “coil bind,” I mean the condition where the coils of the secondary spring come into contact with each other and can no longer compress any further.
The coil-bind load determines when the spring transitions from the main spring rate to the combined spring rate.
When a manufacturer offers several secondary springs with different spring rates, their working lengths are usually standardized.
If the working length stays the same while the spring rate changes, the coil-bind load changes as well.
The higher the spring rate, the higher the coil-bind load.
When you actually compare secondary springs with different rates, you may feel a greater effect from the higher-rate spring and come to the mistaken conclusion that “a lower-rate spring doesn’t push the tire against the ground as hard, while a higher-rate spring does.”
But it isn’t spring rate that pushes the tire against the ground—it’s load.
In fact, the lower the spring rate itself, the greater the effect of the secondary spring can be.
It’s a little counterintuitive, but it’s something worth understanding properly.
So, what matters here is not so much the spring rate itself, but whether the coil-bind load is high or low.
That determines at what stage of cornering the suspension transitions to the combined spring rate, which has a major effect on the understeer/oversteer characteristics.
Take reducing oversteer as an example. A spring with a higher coil-bind load should produce a noticeable shift toward a more stable handling balance at an earlier stage of cornering.
That said, the transition isn’t so abrupt that you can actually feel the exact instant when the secondary spring comes out of coil bind.
The driver perceives it through the resulting change in tire grip balance. However, because of the way the car is structured, there is still no difference in the load on each tire at the exact moment the secondary spring comes out of coil bind, depending on whether the secondary spring is present.
So the driver actually feels the change slightly after the secondary spring comes out of coil bind.
If someone cheerfully tells you, “My senses are so sharp I can feel the exact instant the secondary spring comes out of coil bind!” just smile and say, “Wow, that’s impressive.”
Then give them a polite little smile.
It’s quite difficult to calculate exactly what coil-bind load is appropriate. It isn’t impossible, but it requires so much data and so many calculations that it’s realistically impractical for an individual.
So, basically, you need to prepare several different springs and search for the optimum setup by experimenting with ride height, preload, alignment, and the relationship with the main spring and bump rubber.
It’s quite a bit of work.
If there is an established secondary-spring setup for the same car model, starting from that is probably the easiest way to go.
For rally cars and other vehicles where improving road compliance is more important than steering response, the drawbacks of secondary springs tend to be relatively small.
On a car intended for a high-speed circuit, however, sudden changes in understeer/oversteer characteristics or a loss of steering response can show up as a serious deterioration in handling.
If the coil-bind load is extremely high or extremely low, the effect on the handling balance can be reduced, so that’s at least a little better.
But if you start working around the problem by using multiple springs to make the transition to the combined spring rate as smooth as possible, you eventually end up with nothing more than a variable-rate spring.
Calling it “nothing more than” a variable-rate spring might be a little rude. There are plenty of people working hard to achieve their ideal characteristics this way.
Rebound vs. Bump Travel
Also, although this isn’t limited to secondary-spring setup, increasing rebound travel reduces bump travel.
At the front, for example, the solution depends on whether the understeer is caused by insufficient rebound travel on the inside wheel or insufficient bump travel on the outside wheel.
Adding a secondary spring tends to reduce bump travel, so managing the available suspension travel to prevent bottoming out is extremely important.
At the rear, the tendency is toward oversteer, but the basic situation is the same.
And after writing all of that, I have to admit that if you can get the car properly set up with a single spring, that’s probably the best solution. You don’t need to bolt unnecessary hardware onto the car.
My grandfather always used to say, “Before you start relying on secondary springs, take one more careful look at whether there’s really a problem with your single-spring setup.” He used to say that all the time. Of course, I just made that up.
In any case, the first thing you should do is go back and make sure you’re properly managing the suspension travel.
But everyone has different circumstances, and sometimes a single spring simply won’t get the job done.
For example, people who compete in legal hill climbs on public roads may say, “The rear inside wheel lifts on uphill hairpins…”
And when you’re driving on a rough course, the car can spend quite a lot of time getting airborne and bouncing around, so I can certainly understand wanting more rebound travel.
Using a secondary spring doesn’t necessarily make the car slower, either. There’s nothing wrong with experimenting and trying different things while working through the problem.
Just keep in mind that, for better or worse, secondary springs can have a major effect on understeer/oversteer characteristics and steering response.
So make sure you understand the theory properly before you start working on the setup.